I love using Evernote for keeping track of all sorts of stuff. One of my goals that I wrote down this year in Evernote in January was to get more photos printed out and into a photo album. That way they could be enjoyed on the coffee table by us and by friends when visiting. For 3.5 months I did nothing about it. Until one day in mid-April when I saw how some people are using Becky Higgin's Project Life kit. That day, it all clicked for me. So I ordered my Project Life - Amber Edition and waited for it to arrive. It finally arrived last Wednesday 4/20!

I ripped it open and proceed to be totally engrossed with setting up my album.

Here are the contents of Project Life. Not pictured is a date stamp.
Why do I want to start doing Project Life? Oh let me count the ways. :)
My first print is the one on top. I just pulled up my processed photo from within Windows Explorer and clicked on "print". It automatically sharpened for print.

You can't tell in this photo, but I thought the print on top was a little too sharp, so I printed the same photo again without the sharpening and I think I like it better. It's softer. For people photos I don't like to over-sharpen.
I like it that I can also use the 4x6 size as a canvas in Photoshop and print a collage or two photos on the same sheet and trim them, like this.

Cute smaller photos with room to write the date or small amount of journaling.
To my horror, there was only 5 sheets in the sample packet and I had used them all. So I ordered more from Amazon, because I definitely like how this Canon paper prints and looks. While waiting, I sent a batch of photos to Snapfish to print and mail back to me. I also sent a batch to Costco on Saturday and picked it up two hours later. I have some comparisons.
The top one was printed at home. The bottom was Snapfish.

The Snapfish one was a little bit sharper and darker, but I think the home print is just fine. Plus, home print = instant. Well, 40 seconds anyways. :)
Top one is Snapfish and bottom is Costco.
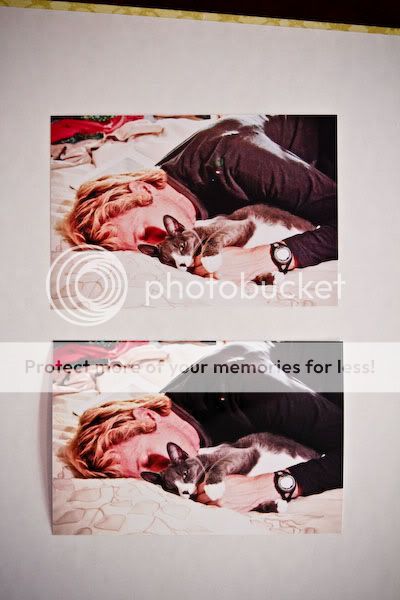
In this instance, I like the Costco print slightly better because Noodle's face and fur wasn't as blown out. On a side note, Costco's online photo processing has an option to turn off processing adjustments, which I really like. I already spend time adjusting my photos in Lightroom, so I don't want them to make further adjustments different than mine.
One last comparison. When I ran out of the Canon photo paper, I found a stack of 100 Strathmore photo papers that I got for free somewhere, somehow. So I printed the top photo using my Canon printer with the Strathmore paper. I hated it. The finish was really dull, as were the colors. The bottom one was Costco.
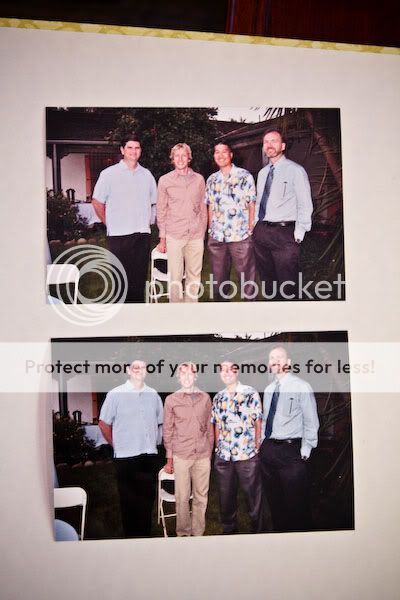
You can't really tell the texture and finish difference between them in this photo. The Strathmore paper was not a good choice for my Canon printer.
So yesterday my glorious Canon paper came. I'm excited to start using it!

Now that you've sat through my long dissertation, here are a few of my pages that I've completed so far.


I inserted a 8.5x11 page protector for Mike and Jen's wedding invite.

I had a lot of photos from the wedding, so I added an extra 12x12 6-up We R Memory Keepers page protector for the extra photos.

Close-up of my 4x6 journaling I created in Photoshop. I printed it out on some Bazzill Basics 8.5x11 white orange-peel texture cardstock and trimmed it.

A couple of pages where I still need to write the journaling.


Oh, I also bought some extra 100 Journaling Cards - 3" x 4" with Grid Design so I have extra journaling cards in case I mess up. I like to be prepared!
I'm really excited to keep going with this Project Life album. I love pulling it out and looking at the photos, and I think friends and family will also. I'll end this post with a couple of inspirational videos of Project Life.
Becky Higgins
Cherish Everyday blog
-------------------------------------------------------------------------------------------------------------
About This Project

New52 is a project started by Peppermint and I to encourage each other and others around us to try something new every week in 2011. The "new" each week doesn't have to be something big. It could be something as simple as ordering a new dish instead of old standbys at your favorite restaurant. It's simply opening your heart up to NEW possibilities.
Don't worry if you're late getting started on joining in. It's totally OK if you miss a week here or there. We encourage everyone to keep an open mind about trying something new. This is a life project, and a photography/blog and even scrap challenge if you wish. If you participate this week, please leave a link to your blog post in the link list below. You can also post images to our New 52 Flickr Group! We would love to see what you were inspired to do.
Read More »

I ripped it open and proceed to be totally engrossed with setting up my album.

Here are the contents of Project Life. Not pictured is a date stamp.
Why do I want to start doing Project Life? Oh let me count the ways. :)
- It's a way to save physical mementos. I had too many ticket stubs and programs scattered all over the place on my desk, with no home.
- Have a physical album to look at and enjoy my photos.
- Todd can contribute to the journaling. He's been doing "OhLife" journaling already.
- Can use additional 8.5x11 page protectors I already have for physical memorabilia.
- Vertical photos can be printed smaller and fit into the vertical slots.
- I can use my Silhouette machine to cut out cute tags and shapes to stick into the slots for journaling.
- I have a place now to stick my Fuji Instax photos!
- Easy workflow of Lightroom upload directly to Flickr, then organize and print from Flickr to Snapfish or local pickup. Or print at Costco or at home.
- Print non-4x6 or vertical photos at home.
- Just starting from now and work backwards if I get a chance. No rules, no worries.
- Print photos from home on Canon MP620 and 4x6 photo paper. (Can put overlays & journaling on digitally first.)
- Can design journaling in Photoshop first and print out on cardstock.
My first print is the one on top. I just pulled up my processed photo from within Windows Explorer and clicked on "print". It automatically sharpened for print.

You can't tell in this photo, but I thought the print on top was a little too sharp, so I printed the same photo again without the sharpening and I think I like it better. It's softer. For people photos I don't like to over-sharpen.
I like it that I can also use the 4x6 size as a canvas in Photoshop and print a collage or two photos on the same sheet and trim them, like this.

Cute smaller photos with room to write the date or small amount of journaling.
To my horror, there was only 5 sheets in the sample packet and I had used them all. So I ordered more from Amazon, because I definitely like how this Canon paper prints and looks. While waiting, I sent a batch of photos to Snapfish to print and mail back to me. I also sent a batch to Costco on Saturday and picked it up two hours later. I have some comparisons.
The top one was printed at home. The bottom was Snapfish.

The Snapfish one was a little bit sharper and darker, but I think the home print is just fine. Plus, home print = instant. Well, 40 seconds anyways. :)
Top one is Snapfish and bottom is Costco.

In this instance, I like the Costco print slightly better because Noodle's face and fur wasn't as blown out. On a side note, Costco's online photo processing has an option to turn off processing adjustments, which I really like. I already spend time adjusting my photos in Lightroom, so I don't want them to make further adjustments different than mine.
One last comparison. When I ran out of the Canon photo paper, I found a stack of 100 Strathmore photo papers that I got for free somewhere, somehow. So I printed the top photo using my Canon printer with the Strathmore paper. I hated it. The finish was really dull, as were the colors. The bottom one was Costco.

You can't really tell the texture and finish difference between them in this photo. The Strathmore paper was not a good choice for my Canon printer.
So yesterday my glorious Canon paper came. I'm excited to start using it!

Now that you've sat through my long dissertation, here are a few of my pages that I've completed so far.


I inserted a 8.5x11 page protector for Mike and Jen's wedding invite.

I had a lot of photos from the wedding, so I added an extra 12x12 6-up We R Memory Keepers page protector for the extra photos.

Close-up of my 4x6 journaling I created in Photoshop. I printed it out on some Bazzill Basics 8.5x11 white orange-peel texture cardstock and trimmed it.

A couple of pages where I still need to write the journaling.


Oh, I also bought some extra 100 Journaling Cards - 3" x 4" with Grid Design
I'm really excited to keep going with this Project Life album. I love pulling it out and looking at the photos, and I think friends and family will also. I'll end this post with a couple of inspirational videos of Project Life.
Becky Higgins
Cherish Everyday blog
-------------------------------------------------------------------------------------------------------------
About This Project

New52 is a project started by Peppermint and I to encourage each other and others around us to try something new every week in 2011. The "new" each week doesn't have to be something big. It could be something as simple as ordering a new dish instead of old standbys at your favorite restaurant. It's simply opening your heart up to NEW possibilities.
Don't worry if you're late getting started on joining in. It's totally OK if you miss a week here or there. We encourage everyone to keep an open mind about trying something new. This is a life project, and a photography/blog and even scrap challenge if you wish. If you participate this week, please leave a link to your blog post in the link list below. You can also post images to our New 52 Flickr Group! We would love to see what you were inspired to do.


